需求
将编码的视频流解码为原始视频数据,编码视频流可以来自网络流或文件,解码后即可渲染到屏幕.
实现原理
正如我们所知,编码数据仅用于传输,无法直接渲染到屏幕上,所以这里利用FFmpeg解析文件中的编码的视频流,并将压缩视频数据(h264/h265)解码为指定格式(yuv,RGB)的视频原始数据,以渲染到屏幕上.
注意: 本例主要为解码,需要借助FFmpeg搭建模块,视频解析模块,渲染模块,这些模块在下面阅读前提皆有链接可直接访问.
阅读前提
代码地址 : Video Decoder
掘金地址 : Video Decoder
简书地址 : Video Decoder
博客地址 : Video Decoder
总体架构
简易流程
FFmpeg parse流程
- 创建format context:
avformat_alloc_context - 打开文件流:
avformat_open_input - 寻找流信息:
avformat_find_stream_info - 获取音视频流的索引值:
formatContext->streams[i]->codecpar->codec_type == (isVideoStream ? AVMEDIA_TYPE_VIDEO : AVMEDIA_TYPE_AUDIO) - 获取音视频流:
m_formatContext->streams[m_audioStreamIndex] - 解析音视频数据帧:
av_read_frame - 获取extra data:
av_bitstream_filter_filter
FFmpeg decode流程
- 确定解码器类型:
enum AVHWDeviceType av_hwdevice_find_type_by_name(const char *name) - 创建视频流:
int av_find_best_stream(AVFormatContext *ic,enum FfmpegaVMediaType type,int wanted_stream_nb,int related_stream,AVCodec **decoder_ret,int flags); - 初始化解码器:
AVCodecContext *avcodec_alloc_context3(const AVCodec *codec) - 填充解码器上下文:
int avcodec_parameters_to_context(AVCodecContext *codec, const AVCodecParameters *par); - 打开指定类型的设备:
int av_hwdevice_ctx_create(AVBufferRef **device_ctx, enum AVHWDeviceType type, const char *device, AVDictionary *opts, int flags) - 初始化编码器上下文对象:
int avcodec_open2(AVCodecContext *avctx, const AVCodec *codec, AVDictionary **options) - 初始化视频帧:
AVFrame *av_frame_alloc(void) - 找到第一个I帧开始解码:
packet.flags == 1 - 将parse到的压缩数据送给解码器:
int avcodec_send_packet(AVCodecContext *avctx, const AVPacket *avpkt) - 接收解码后的数据:
int avcodec_receive_frame(AVCodecContext *avctx, AVFrame *frame) - 构造时间戳
- 将解码后的数据存到
CVPixelBufferRef并将其转为CMSampleBufferRef,解码完成
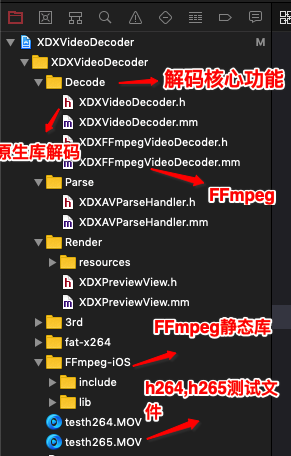
文件结构
快速使用
初始化preview
1
2
3
4
5
6
7
8
9
10
- (void)viewDidLoad {
[super viewDidLoad];
[self setupUI];
}
- (void)setupUI {
self.previewView = [[XDXPreviewView alloc] initWithFrame:self.view.frame];
[self.view addSubview:self.previewView];
[self.view bringSubviewToFront:self.startBtn];
}解析并解码文件中视频数据
1
2
3
4
5
6
7
8
9
10
11
12
13
14
15
16
- (void)startDecodeByFFmpegWithIsH265Data:(BOOL)isH265 {
NSString *path = [[NSBundle mainBundle] pathForResource:isH265 ? @"testh265" : @"testh264" ofType:@"MOV"];
XDXAVParseHandler *parseHandler = [[XDXAVParseHandler alloc] initWithPath:path];
XDXFFmpegVideoDecoder *decoder = [[XDXFFmpegVideoDecoder alloc] initWithFormatContext:[parseHandler getFormatContext] videoStreamIndex:[parseHandler getVideoStreamIndex]];
decoder.delegate = self;
[parseHandler startParseGetAVPackeWithCompletionHandler:^(BOOL isVideoFrame, BOOL isFinish, AVPacket packet) {
if (isFinish) {
[decoder stopDecoder];
return;
}
if (isVideoFrame) {
[decoder startDecodeVideoDataWithAVPacket:packet];
}
}];
}将解码后数据渲染到屏幕上
1
2
3
4
-(void)getDecodeVideoDataByFFmpeg:(CMSampleBufferRef)sampleBuffer {
CVPixelBufferRef pix = CMSampleBufferGetImageBuffer(sampleBuffer);
[self.previewView displayPixelBuffer:pix];
}
具体实现
1. 初始化实例对象
因为本例中的视频数据源是文件,而format context上下文实在parse模块初始化的,所以这里仅仅需要将其传入解码器即可.1
2
3
4
5
6
7
8
9
10
11
12- (instancetype)initWithFormatContext:(AVFormatContext *)formatContext videoStreamIndex:(int)videoStreamIndex {
if (self = [super init]) {
m_formatContext = formatContext;
m_videoStreamIndex = videoStreamIndex;
m_isFindIDR = NO;
m_base_time = 0;
[self initDecoder];
}
return self;
}
2. 初始化解码器
1 | - (void)initDecoder { |
2.1. 创建解码器上下文对象
1 | - (AVCodecContext *)createVideoEncderWithFormatContext:(AVFormatContext *)formatContext stream:(AVStream *)stream videoStreamIndex:(int)videoStreamIndex { |
av_find_best_stream : 在文件中找到最佳流信息.
- ic: 媒体文件
- type: video, audio, subtitles…
- wanted_stream_nb: 用户请求的流编号,-1表示自动选择
- related_stream: 试着找到一个相关的流,如果没有可填-1
- decoder_ret: 非空返回解码器引用
- flags: 保留字段
avcodec_parameters_to_context: 根据提供的解码器参数中的值填充解码器上下文
仅仅将解码器中具有相应字段的任何已分配字段par被释放并替换为par中相应字段的副本。不涉及解码器中没有par中对应项的字段。
- av_hwdevice_ctx_create: 打开指定类型的设备并为其创建AVHWDeviceContext。
- avcodec_open2: 使用给定的AVCodec初始化AVCodecContext,在使用此函数之前,必须使用avcodec_alloc_context3()分配内存。
1 | int av_find_best_stream(AVFormatContext *ic, |
2.2. 创建视频帧
AVFrame 承载了原始的音视频数据.AVFrame通常被分配一次然后多次重复(例如,单个AVFrame以保持从解码器接收的帧)。在这种情况下,av_frame_unref()将释放框架所持有的任何引用,并在再次重用之前将其重置为其原始的清理状态。
1 | // Get video frame |
3. 开始解码
首先找到编码数据流中第一个I帧, 然后调用avcodec_send_packet将压缩数据发送给解码器.最后利用循环接收avcodec_receive_frame解码后的视频数据.构造时间戳,并将解码后的数据填充到CVPixelBufferRef中并将其转为CMSampleBufferRef.1
2
3
4
5
6
7
8
9
10
11
12
13
14
15
16
17
18
19
20
21
22
23
24
25
26
27
28
29
30
31
32
33
34
35
36
37
38
39
40
41- (void)startDecodeVideoDataWithAVPacket:(AVPacket)packet {
if (packet.flags == 1 && m_isFindIDR == NO) {
m_isFindIDR = YES;
m_base_time = m_videoFrame->pts;
}
if (m_isFindIDR == YES) {
[self startDecodeVideoDataWithAVPacket:packet
videoCodecContext:m_videoCodecContext
videoFrame:m_videoFrame
baseTime:m_base_time
videoStreamIndex:m_videoStreamIndex];
}
}
- (void)startDecodeVideoDataWithAVPacket:(AVPacket)packet videoCodecContext:(AVCodecContext *)videoCodecContext videoFrame:(AVFrame *)videoFrame baseTime:(int64_t)baseTime videoStreamIndex:(int)videoStreamIndex {
Float64 current_timestamp = [self getCurrentTimestamp];
AVStream *videoStream = m_formatContext->streams[videoStreamIndex];
int fps = DecodeGetAVStreamFPSTimeBase(videoStream);
avcodec_send_packet(videoCodecContext, &packet);
while (0 == avcodec_receive_frame(videoCodecContext, videoFrame))
{
CVPixelBufferRef pixelBuffer = (CVPixelBufferRef)videoFrame->data[3];
CMTime presentationTimeStamp = kCMTimeInvalid;
int64_t originPTS = videoFrame->pts;
int64_t newPTS = originPTS - baseTime;
presentationTimeStamp = CMTimeMakeWithSeconds(current_timestamp + newPTS * av_q2d(videoStream->time_base) , fps);
CMSampleBufferRef sampleBufferRef = [self convertCVImageBufferRefToCMSampleBufferRef:(CVPixelBufferRef)pixelBuffer
withPresentationTimeStamp:presentationTimeStamp];
if (sampleBufferRef) {
if ([self.delegate respondsToSelector:@selector(getDecodeVideoDataByFFmpeg:)]) {
[self.delegate getDecodeVideoDataByFFmpeg:sampleBufferRef];
}
CFRelease(sampleBufferRef);
}
}
}
- avcodec_send_packet: 将压缩视频帧数据送给解码器
- avcodec_receive_frame: 从解码器中获取解码后的数据
4. 停止解码
释放相关资源1
2
3
4
5
6
7
8
9
10
11
12
13
14
15
16
17
18
19
20
21
22- (void)stopDecoder {
[self freeAllResources];
}
- (void)freeAllResources {
if (m_videoCodecContext) {
avcodec_send_packet(m_videoCodecContext, NULL);
avcodec_flush_buffers(m_videoCodecContext);
if (m_videoCodecContext->hw_device_ctx) {
av_buffer_unref(&m_videoCodecContext->hw_device_ctx);
m_videoCodecContext->hw_device_ctx = NULL;
}
avcodec_close(m_videoCodecContext);
m_videoCodecContext = NULL;
}
if (m_videoFrame) {
av_free(m_videoFrame);
m_videoFrame = NULL;
}
}